PathAway GPS
GPS Navigation and Tracking Software
for Android Smartphones and Tablets
User Manual
Contents
- Getting Started
- Main Map Screen
- Toolbar Buttons
- Navigating with GPS
- Recording Tracks
- Navigating with Routes
- Starting a new Trip
- Viewing Maps
- Navigating without Maps
- Using Custom PathAway Maps
- Capturing Points on a Map
- Customizing Screens
- Improving Visibility of Navigation Lines
- Entering Location Coordinates
- Importing Maps and Data
- Reference
- Terminology
- Further Information and Instructions
Getting Started Drag Help Title Bar to resize this panel
PathAway is designed for navigating in the outdoors for any activity, tracking your progress, recording points of interest, and planning and following routes to navigate on. The main functions are:
 Maps:
Maps are the central display feature in PathAway. PathAway supports a
variety of free downloadable maps including, street, satellite,
topographic, nautical, and aviation. In Express Edition or higher you
can create and import your own custom maps, or use premium maps from
third parties. With maps, you can zoom in our out for a better view.
PathAway even works with no maps at all if you just need to follow a
route without the need for a map.
Maps:
Maps are the central display feature in PathAway. PathAway supports a
variety of free downloadable maps including, street, satellite,
topographic, nautical, and aviation. In Express Edition or higher you
can create and import your own custom maps, or use premium maps from
third parties. With maps, you can zoom in our out for a better view.
PathAway even works with no maps at all if you just need to follow a
route without the need for a map.
When the App is first started, there are no maps on the device. PathAway will immediately begin to download maps to fill the area of the screen. When you zoom in or out, PathAway will again need to download the maps of the viewing area. Once these map sections are downloaded, they are stored on the device so you don't need to download them again. Once downloaded they'll be available when you travel out of cell coverage range. It's recommended that you download all of the required maps using your Wifi network before heading out. For more details on maps see Viewing Maps.
 Show your Location: Showing your location on a map and displaying your direction of travel, speed, elapsed time.
This is done by utilizing the internal location detection components of your device.
For the most accurate location, PathAway utilizes the internal GPS (Global Positioning Satellite). You can also configure your device to receive Bluetooth GPS.
The GPS will obtain reports from satellites to obtain your location on earth.
Getting your location can take anywhere from a few seconds to several minutes. Once obtained, your location will be displayed on a default map.
Note, these maps are downloaded automatically from the internet as you view them.
Once downloaded, they will then be available offline so they can be viewed when you go out of cell data range.
Show your Location: Showing your location on a map and displaying your direction of travel, speed, elapsed time.
This is done by utilizing the internal location detection components of your device.
For the most accurate location, PathAway utilizes the internal GPS (Global Positioning Satellite). You can also configure your device to receive Bluetooth GPS.
The GPS will obtain reports from satellites to obtain your location on earth.
Getting your location can take anywhere from a few seconds to several minutes. Once obtained, your location will be displayed on a default map.
Note, these maps are downloaded automatically from the internet as you view them.
Once downloaded, they will then be available offline so they can be viewed when you go out of cell data range.
 Navigate: Find your way by following a route.
Routes in PathAway are what you create or import to navigate with. Routes are composed of either a single location that you are navigating to,
or multiple locations that are followed in sequence (like a trail, road, waterway) where there are many changes in direction along the way.
PathAway provides the tools to import and create these routes,
as well as to provide guidance to follow the routes to get to your destination. PathAway even provides alarms to alert you if you stray off the route, or of upcoming important locations.
Navigate: Find your way by following a route.
Routes in PathAway are what you create or import to navigate with. Routes are composed of either a single location that you are navigating to,
or multiple locations that are followed in sequence (like a trail, road, waterway) where there are many changes in direction along the way.
PathAway provides the tools to import and create these routes,
as well as to provide guidance to follow the routes to get to your destination. PathAway even provides alarms to alert you if you stray off the route, or of upcoming important locations.
![]() Tracking: As you travel, PathAway can record your movements so you have a complete record of where you've traveled.
This is useful if you want to use the track later to find your way home (BackTrack),
to follow the track at some later date, or to keep records of the track including the time, speed, distance.
Tracks can also be used for area measurements, or map and trail making purposes.
Tracking: As you travel, PathAway can record your movements so you have a complete record of where you've traveled.
This is useful if you want to use the track later to find your way home (BackTrack),
to follow the track at some later date, or to keep records of the track including the time, speed, distance.
Tracks can also be used for area measurements, or map and trail making purposes.
 Points: Points are specific locations that are captured for reference purposes (like favorite fishing spots, shoals, navaids, addresses, intersections). You can create and edit as many points as you like in PathAway.
Each point can include details such as name, icon, description, picture or video. Points can even be imported from external sources for display on your maps.
Points: Points are specific locations that are captured for reference purposes (like favorite fishing spots, shoals, navaids, addresses, intersections). You can create and edit as many points as you like in PathAway.
Each point can include details such as name, icon, description, picture or video. Points can even be imported from external sources for display on your maps.
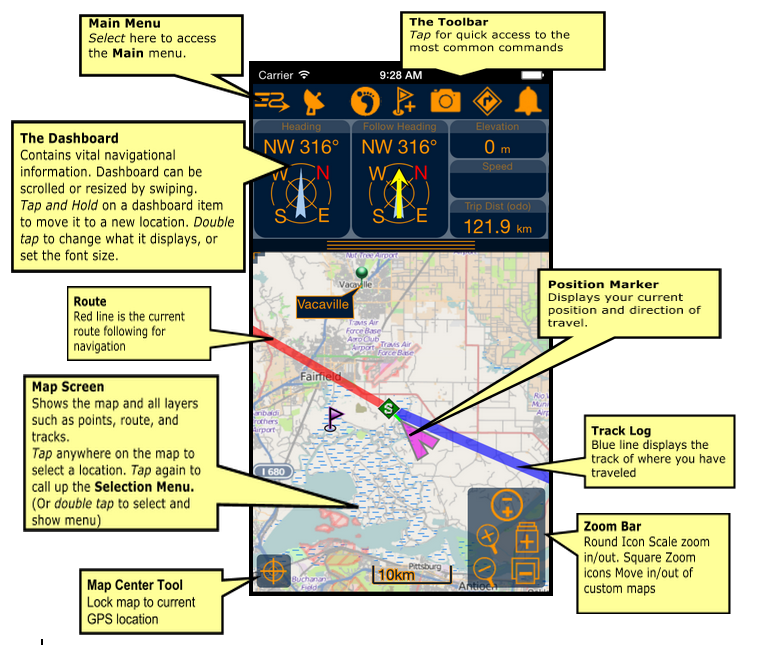
Main Map Screen
Once you exit the Startup screen, you are presented with the main PathAway Map View Screen. When you first run the App, it will start to search for your current location using the GPS. If the position cannot be located, it will be centered on the default location.
Feel free to experiment by tapping on parts of the screen. The bar at
the top contains the main options. The top left is the  Main
Menu. Tapping on the map selects the area, tapping again will bring
up a menu of options to perform on that area. (tap and hold
selects and brings up the menu at once). The area of information and
trip statistics is called the Dashboard. It is sizable
and scrollable so you can easily get to the info you want and to
control how much you see on the screen at one time. Swipe it to
scroll, drag the handles to size. Double tap on any dashboard item to
change its type and font. Tap and hold on a dash item to drag
and move the item.
Main
Menu. Tapping on the map selects the area, tapping again will bring
up a menu of options to perform on that area. (tap and hold
selects and brings up the menu at once). The area of information and
trip statistics is called the Dashboard. It is sizable
and scrollable so you can easily get to the info you want and to
control how much you see on the screen at one time. Swipe it to
scroll, drag the handles to size. Double tap on any dashboard item to
change its type and font. Tap and hold on a dash item to drag
and move the item.
The following illustration shows the
primary screen areas of PathAway.
Toolbar Buttons
The toolbar contains a set of icons designed for quick access to the most common functions.
Main Menu:
Brings up the PathAway main menu. See the Reference section for details on main menu options.
Connect/Disconnect GPS:
When connected to GPS, turns to
a Lock icon when a GPS fix is obtained.
![]() Tracking:
Tracking:
Select activity, route, track recording
options and Start/Stop Trip timer.
Start Tracking records tracks to a track log (if Record To Track Log is enabled, see Recording Tracks). When recording a location
point will be added a specific intervals as you travel. These
intervals can be adjusted in the Settings-Tracking
dialog. Tracking can be paused/stopped/restarted by pressing this button.
Pausing a track stops the time recording so you can take a break and Resume Tracking later.
Stopping a track logging session, ends the tracking so the log won't be written to again.
Reset Trip stops the current track recording,
and starts a new trip by clearing all trip statistics, and starting to record to a new track log.
Add Point:
Add a point (waypoint) at the current location. Brings up a menu with options for adding points. Quick Point simply adds a new point. Add Point adds a new point and brings up the Edit Point dialog so you can name and describe the point, choose it's icon,
and select a picture or video to link to the point.
Navigate:
Quick access to route navigation options including Edit Route, Create New Route,
Clear Route, Select Route.
 Enable/Disable All Alarms:
PathAway contains many
audible alarm sounds such as Off Track Warning, Proximity to Point
Approaching and Reached, Next Turn approaching and reached, Altitude
Warning, GPS Fix Acquired/Lost, Remote
Location Notifications. This option silences all alarms when off. When On, the alarms
selected in the Settings-Alarms dialog will be
sounded when required.
 Take Picture:
Quick access to take a georeferenced
picture point. This option will take you directly to the Camera screen, when you can snap a picture and save it immediately. A point will be created with the picture.
You can edit the name, description, icon of the point later.
 GPS Centering Tool
The GPS Centering tool is located in the bottom left of the screen. Press this button to keep the current
location centered on the map. This automatic centering is turned off when
the map is scrolled manually. indicates
the marker is in auto-center mode.
indicates
the marker is in auto-center mode.
Zoom Buttons
The zoom toolbar contains the icons for zoom in and out of maps by
scaling or switching to a map of higher or lower resolution. The Zoom
Buttons are located in the bottom right of the screen.
Scale Zoom In - Zoom in to a higher resolution image of
the map at the current location. Also can be thought of as zooming in
closer. If viewing a Webmap, a new map will be downloaded from the internet if it hasn't already been stored on the device.
 Scale Zoom Out - Zoom out to a lower
resolution image of the map at the current location. Also can be
thought of as zooming out further. If viewing a Webmap, a new map will be downloaded from the internet if it hasn't already been stored on the device.
Scale Zoom Out - Zoom out to a lower
resolution image of the map at the current location. Also can be
thought of as zooming out further. If viewing a Webmap, a new map will be downloaded from the internet if it hasn't already been stored on the device.
 Custom Map Zoom In - Zoom In to another Custom Map. When the Custom Map
Zoom In
button is highlighted, it means there is a higher resolution custom map
at the current location. Pressing this button, will show this custom
map on the screen. If unchecked, then the view will zoom out to the
WebMap or virtual map view where no map is shown on the screen. If
there is no active custom map, this button performs a Scale Zoom In.
Custom Map Zoom In - Zoom In to another Custom Map. When the Custom Map
Zoom In
button is highlighted, it means there is a higher resolution custom map
at the current location. Pressing this button, will show this custom
map on the screen. If unchecked, then the view will zoom out to the
WebMap or virtual map view where no map is shown on the screen. If
there is no active custom map, this button performs a Scale Zoom In.
 Custom Map Zoom Out -
When the Custom Map Zoom Out is checked, it means there is a lower resolution
custom map at the current location. Pressing this button, will show
this map on the screen. If unchecked, then the view will zoom out to a
WebMap or a virtual map view where no map is shown on the screen. If
there is no active custom map, this button performs a Scale Zoom Out.
Custom Map Zoom Out -
When the Custom Map Zoom Out is checked, it means there is a lower resolution
custom map at the current location. Pressing this button, will show
this map on the screen. If unchecked, then the view will zoom out to a
WebMap or a virtual map view where no map is shown on the screen. If
there is no active custom map, this button performs a Scale Zoom Out.
 Custom Map Zoom Full -
Zoom back to the full map resolution (100% scale). Applies only to custom maps.
Custom Map Zoom Full -
Zoom back to the full map resolution (100% scale). Applies only to custom maps.
 Select Map - Custom Maps are
organized in a heirarchial layer order based on the resolution of the
map. The Select Map tool allows you to select which map to view. Only
maps that fall within the current centered location will be shown.
Select Map - Custom Maps are
organized in a heirarchial layer order based on the resolution of the
map. The Select Map tool allows you to select which map to view. Only
maps that fall within the current centered location will be shown.
Navigating with GPS
By default PathAway will automatically search for your current
location, and center the screen to it. The GPS Toolbar icon indicates
whether the GPS is connected or not. If the GPS OFF icon  is shown, then this indicates the GPS is
turned off and your position will not be updated. If the GPS is Off,
then press the GPS icon to connect. PathAway will turn on the GPS and
start acquiring satellites as indicated by the Searching GPS icon
is shown, then this indicates the GPS is
turned off and your position will not be updated. If the GPS is Off,
then press the GPS icon to connect. PathAway will turn on the GPS and
start acquiring satellites as indicated by the Searching GPS icon . Once a fix of your location is obtained,
the icon will change to the GPS 'Fixed' icon,
and your current location will be centered in the map view. If WebMaps
are turned off, or a map for the current location cannot be downloaded,
then then a blank (or virtual) map will be shown.
. Once a fix of your location is obtained,
the icon will change to the GPS 'Fixed' icon,
and your current location will be centered in the map view. If WebMaps
are turned off, or a map for the current location cannot be downloaded,
then then a blank (or virtual) map will be shown.
PathAway will always keep the current position centered. If you
scroll the map manually then the auto-centering is disabled so you can
freely scroll the map around. You can press the Re-Center tool to return the map to the current GPS
location. The Center tool icon will change to a circle with cross-hairswhen the
map is in auto-center mode.
 Recording Tracks
When PathAway has a fix of your location and you start moving, you can record your travel by "Tracking" your movements.
Controlling the tracking is done via the Tracking toolbar icon ![]() . Pressing
this button, then the Start Tracking option, will start recording your movements. The footprints in the
Tracking icon will start animating to show the
track recorder is on.
. Pressing
this button, then the Start Tracking option, will start recording your movements. The footprints in the
Tracking icon will start animating to show the
track recorder is on.
To see the time and distance you have traveled, ensure you are on a screen that has a Dashboard item showing this, such as the Tracking Screen (see main menu Screens->Tracking View). You can pause and resume track recording by pressing the Tracking icon, then Pause. The animation of the icon will stop, as will the time and distance recording. Press the button again to restart the track recording. Once you are finished your trip, press the Tracking button again, and choose Stop. You will then be shown your track trip statistics. The next time, you start tracking again, a new track log will be created.
For Tracking, you can also choose to record your tracks to a Tracking Database. This is done when the Tracking-Record to Track Log checkbox is on. If you turn on "Record to a Track Log, then PathAway will create a Track Log database and record each movement to the log.With Track log recording on, When traveling, you will see a blue line on the map indicating where you've been.
Once you've recorded a track log, you can then use the tracks to
"Follow" as a route, the next time you need to go on the same track.
A useful feature for tracking is "BackTracking".
If you're out on a trail, and need to find your way back, you can
simply choose the Route icon and press "BackTrack" feature to
follow your recorded track to the start.
You can record tracks for later use, or to see where you've been. This is especially helpful in case you start going in circles!
Tracking databases can get quite large, especially if you are capturing constantly. This can slow screen refreshing down and consume a large amount of memory. The Settings-Tracks, has some options for controlling track database size, and recording precision. A good detailed track for traveling between 30 and 60 mph is to set the precision to record position every 10 seconds.
In this dialog, you can alternatively, set the tracking to record at certain distances. This will create a track record when you reach a certain distance. Therefore all track points will be of equal distance apart, regardless of your speed.
Navigating with Routes
Navigating to find your way is the primary function of PathAway, and one of it's most powerful features. You can navigate simply by following your location on a map, but the most accurate and reliable way is to use a Route. A Route is simply a series of points connected together to form your line of travel. You "Follow" this line to reach your destination. Routes can be obtained by Importing from external file via Data-Import, created manually using PathAway's powerful Route Design Tools, or using a previously recorded Track Log as your route.
A common route in PathAway is the "BackTrack" feature where you travel in one direction while recording your tracks, then use the "BackTrack" feature to find your way home along the same track you just travelled. A great feature if you get lost or encounter darkness or fog.
Creating Routes
With PathAway you can create point-to-point routes to follow for navigation. You can choose to select an individual point or create a multi-point route.
Navigating to a Single Point
You can set PathAway up to navigate to a single point by selecting a point from your stored Points, or by selecting a point on the map. To select a point on the map to navigate to, tap and hold a location of the point to navigate to.
From the menu, choose "Add Route Pt". On the next dialog, choose the option "Navigate to Point", and choose OK. PathAway will then show a direct line from your current position to the point. Navigate by following direction towards the point as indicated by the line.
To navigate to a stored point, choose Data->Points from the main menu. By default, this dialog shows the Points from your Personal Points database called “My Points”. From this dialog, select the Point to navigate to.
Once selected, you are shown the Point Info screen. From the bottom toolbar, choose the Tools icon and select the "Navigate to Point" option. This will set the selected point as the destination. Press Back until you are at the main map. You will see the line directing you to the selected point.
To view details on the time to travel to the point, and the distance to the point, select the Route View, from the Screens menu. You will now see the estimated time to travel to the point. (ETE), the distance to the point, and the Heading required to reach the point.
Creating Multi-Point Routes
Of course, in many situations, you will want to navigate along a certain path instead of direct to a point. For this, you need to create multi-point routes. These are simply a list of points aligned in sequence. A track log that you have recorded is actually a multi-point route that you can use to navigate with, such as finding your way home along the same path you came.
You can create multi-point routes in a number of ways. Here are the common methods used in PathAway:
Method 1 - Import Route: Quite often, you will find there are many routes or trails available on the internet. These routes are often available to import into your GPS device. These same file can be imported into PathAway to be used for navigation. The most common formats are GPX (Geo Exchange Format) and KML/KMZ (Google Earth format). See the Data-Import dialog for details on importing routes.
Method 2 - Draw Route using Route Designer: The Route Designer is a powerful tool where you can add route points simply by tapping on points on the maps. To access the Route Designer, press the Navigate toolbar
and choose Create New Route, or Edit Current route. To add points, tap on the map. To edit existing route points, tap on a point,
then drag the point to the new location or use one of the route tools to delete, or move the route point up or down in the sequence. You can set Route Designer to add points to End/Start or Insert.
In the PRO Edition, you can create routes that automatically follow roads or trails when you add points. Press the 'X" in the top right corner and save your route.
Method 3 - Add Route Points from map: To create a multi-point route from any point on the map, start by Tap and Hold
on the start point of the route on the map. From the menu, choose Add
Route Pt. A sub menu will then appear. Choose New Route. In
the dialog, select "New Route starting at selected point". to
make this point the beginning of your route. Press OK.
Once done, you will see a Start icon  on the map indicating the start of
the route.
on the map indicating the start of
the route.
The next step is to start adding other points to the route. This is done by tapping on the map, and choosing Add to Route. The point will be added to the route, and the route line is altered to reflect the change.
You will notice, if you scroll the map around you there will also be a green line showing the line to the closest point in your route. PathAway will always calculate the closest point on your route and direct you towards it via the green line, Heading indicator, or Off-Track warnings. This is helpful if you get off-track and need to find your way back to the route.
Naming Routes:To give the route a name, go into Data->Routes, your route will be selected and have the (f) symbol beside it indicating you’re Following the route forward (you can also follow routes in Reverse order). From this dialog, choose your route, then select the Edit option from the top bar. Here you can enter the name of your Route and the type of Activity.
Capturing Points on a Map
When the Add Point menu
is selected, a menu with options for adding points is displayed. Quick Point simply adds a new point. Add Point adds a new point and brings up the
Edit Point dialog so you can name and describe the point, choose it's icon, position and elevation. You can even take a picture to attach to the
location. Position will be already entered because the point has a location on the map. If you had a valid GPS position,
the true position and elevation would be entered.
Points can also be added by tap and hold on the map (or if the point is already selected, just single tap on the flag) and choosing the "Add Point" menu option.
If the point location needs to be adjusted, then you can edit the location coordinates in the Edit Point dialog, or tap and hold the point to select it, then choose Adjust Location to tap to a new position on the map to move the point to.
Starting a new Trip
When you have completed a trip, and are ready to start a new trip, you can quickly configure the trip options by Starting a new trip in the Navigate->Trip Setup dialog.
Start New Trip
In this screen you will see options for creating, and choosing trips.
To continue, we’ll clear out the current route and trip data. Select the option No in Follow Active Route, Yes to Record to Track Log, and Yes to Reset Odometer. Press the OK button to dismiss the dialog.
Viewing Maps
PathAway can be setup to automatically download maps from the Internet as you navigate. By default WebMaps is configured to use the community contributed maps from OpenStreetMap.com. Other sources are also available, and can be chosen from the Maps->WebMaps dialog.
The portions of the WebMaps are downloaded and cached locally on your device. The map cache can be also be managed in this dialog. If you are traveling to an area where there will be no data connection, it is advised that you pre-download maps beforehand. This is done by zooming and scrolling around to force the areas of the maps you need to download to the cache.
If you have WebMaps turned on, then maps will be automatically downloaded to fill your screen. Zooming in and out will download new map sections of the requested resolution.
Note: If you are simply browsing maps, You can turn the GPS off
by pressing the GPS toolbar icon to save
battery power.
Navigating without Maps
PathAway works with or without maps. When used without maps, PathAway will display all points in a virtual Longitude and Latitude world. You can Zoom In and Zoom Out to increase and decrease the Scale factor of your view. If you have points, routes, or Tracks defined, PathAway will display them on the screens. GPS connectivity works well with or without maps. To view without maps, turn the "View->Show Webmaps" setting off.
Using Custom PathAway Maps
One of the most powerful features of PathAway is support for using customized maps, calibrated for GPS navigation. These maps are created using PathAway PC Tools or obtained from 3rd party sources. These maps are installed into PathAway and can be accessed via the Maps->Custom Maps menu. When installed in PathAway, custom maps are layered based on their level of resolution. This allows you to Zoom into and out of viewing these custom maps.
- For instructions on importing maps into PathAway, see the section Importing Maps and Data.
- For further information and tools for creating PathAway maps visit http://pathaway.com
and follow the Tools, and Links
options.
Changing Custom Map Views
There are two different ways to change the view of the map:
- By zooming in or out of different maps or
- By scaling the current map. I.e.: Expanding or Shrinking the current map.
1. Zooming Between Maps
You can install as many different custom maps as you like into
PathAway. PathAway will organize and layer the maps depending on the
scale and geographic coordinates of the map. Think of the maps as if
they are organized from above the surface of the earth. When you are up
very high, you see a wider area. Moving closer (or down) you see less
area and more detail. So Map Zoom In moves you
closer, and Map Zoom out moves you further away.
When you have two or more maps within the same geographic location that
you are centered on, you can switch in and out of these maps in one of
the following ways:
- select the toolbar icon to Map Zoom In, select
the for Map
Zoom Out
- or Bring up the Main Menu. Choose "Zoom Map", and select Zoom Map In, or Zoom Map Out or select "Choose Map >" and select the map by name.
The Map Zoom buttons allow you to move into
and out of these stacked maps. You don't need a map to increase or
decrease the view, but if there is a map available, it will be shown.
These buttons change shape to show you whether there is a map
available.
A highlighted zoom ![]() button indicates there is a map available. An
un-highlighted zoom
button indicates there is a map available. An
un-highlighted zoom ![]() button means there is not.
button means there is not.
Please note, moving between stacked maps should not be
confused with map scaling where you zoom into or out of a single map by
expanding or shrinking the map.
2. Scaling a Map (Expand/Shrink)
You can expand or shrink your custom maps on the view screen to show a wider area or to get "close" to a location, while still rendering a view of the map. To scale maps use one of the following methods:
- select the
or buttons
or
- select the Zoom Map menu, and select Zoom Scale In, or Zoom Scale Out.
When you zoom in, all of the map pixels are expanded to show you a closer look at the area. When you zoom out, you will see a wider view of the map. To return to the original map pixels select the Zoom Map menu and choose Scale 100%.
Customizing Screens
All of the screens contain a separate customizable dashboard. Each screen has a dashboard setup associated with it. Here is how to customize the dashboard.
To Hide the Dashboard, choose the main menu select View, then turn off Show Dashboard.
Choose the View menu option Show
Dashboard to turn the dashboard back on.
To resize the dashboard, simply press and drag the dashboard to the
size you like. The dashboard can be minimized completely for maximum
map viewing area.
You can also utilize the entire full view of the screen by turning the Top Toolbar off by selecting the View menu and choosing Hide Toolbar.
To adjust individual dashboard items, double tap the item you would like to customize. The Dashboard Options menu will appear showing the currently selected item and the options to available to set for the dashboard.
To move a Dashboard item, press and hold on the item, then drag it to the new location on the dashboard.
When there is no active information available for a dashboard control item, or the dashboard item is hidden, only a small bar will be displayed. Select one of the bars to bring up the dashboard menu. You can then add a new Dashboard item in the space.
Improving Visibility of Navigation Lines
You can increase the visibility of navigation data on the map screen. This is done by adjusting the size and color of route and track lines, or by selecting a larger or a different style of position marker. To do this, choose the Settings menu, and select the category Color and Lines.
In the Colors & Lines settings, you can change the way the lines and colors on the maps are displayed. You can create easy-to-read contrast between your maps and route and track lines. Experiment with this option until you've found a view that suits you. You can even change the look of the current Position Marker by selecting between 3 different styles.
For example, to change the way the active route you are following is drawn, click on the Active Route option. This will bring up the Line Style dialog and display the current style for the Active Route. Change the color by clicking on the Color button, and the width of the line by pressing either the + or - buttons beside the width label. To have a circle drawn at each Route Point, check the Show Points button. You can even set the level of transparency so map data can be seen behind the route line.
The Position Marker is the Arrow or cursor in the center of the screen. It represents your current geographical position on the map. If you are navigating with a GPS, it points in your direction of travel. If you are disconnected and following a route, it will point in the direction to the next point in the route. You can set the style of direction pointer in the Position Marker Style dialog. To do this, click on the Position Marker, from the Lines & Style Dialog. In the Position Marker Style dialog, you can choose the desired Direction Arrow style, color, and size of the marker.
Entering Location Coordinates
Location coordinates are the values used to represent an exact location on earth. These are defined in a number of ways. The most universal is via longitude and latitude. Other coordinate systems include UTM and USGB. You can setup your default location coordinates in the Settings->Coordinates Dialog.
Entering Longitude/Latitude Coordinates
The geographical coordinates are specified as the vertical distance from the equator known as latitude, and horizontal distance from the Central meridian over Greenwich England, known as longitude. These coordinates are entered in one of these available formats:
Hemisphere Coordinates Latitude coordinates north of the equator are prefixed by 'N' or a positive number. Coordinates in the southern hemisphere are prefixed by 'S' or negative numbers.
Examples:
Hemisphere-Degrees-minutes:
N45 30.500, W79 30.500
* must be a space between degrees and minutes.
* no space between hemisphere and degrees
Hemisphere-Degrees-minutes-seconds:
N45 30 30.0, W79 30 30
* must be a space between degrees, minutes, and seconds.
* no space between hemisphere and degrees
Decimal degrees:
45.505, -79.505 or
N45.505 W79.505
* Latitude positive values specify Northern Hemisphere.
* Longitude positive values specify
* no space between hemisphere and degrees
Entering UTM Coordinates
Universal Transverse Mercator (UTM) coordinates define two dimensional, horizontal, positions. The sixty UTM zone numbers designate 6 degree wide longitudinal strips extending from 80 degrees South latitude to 84 degrees North latitude. UTM zone characters are letters which designate 8 degree zones extending north and south from the equator. Beginning at 80° south and proceeding northward, twenty bands are lettered C through X, omitting I and O. These bands are all 8° wide except for bond X which is 12° wide (between 72-84 N). There are some zones that are of different size. See the Map Projections manual for more info on UTM.
If you have set your Settings to UTM coordinates (see Tools->Settings->General),
the data is entered as follows:
Grid Zone:
Format: <Zone Number><Zone Letter Designator>
Example: 17T, meaning Zone Number 17, Designator T.
Northing:
Northing or vertical value specified in Metres within the Grid Zone.
Example: 5001954
Easting:
Easting or horizontal value specified in Metres within the Grid Zone.
Example: 0603881
Entering OSGB Coordinates
Ordinal Survey of Great Britain (OSGB) coordinates define two
dimensional, horizontal, positions within the area of Great Britain.
If you have set your Settings to UTM coordinates (see Tools->Settings->General),
the data is entered as follows:
Grid Zone:
Format: <Two Letter Designator>
Example: ST
Northing:
Northing or vertical value specified in Metres within the Grid Zone.
Example: 02115
Easting:
Easting or horizontal value specified in Metres within the Grid Zone.
Example: 17353
Importing Maps and Data
To import PathAway custom maps, you'll need to convert them to
PathAway .prc format. You can use our Map Manager for Windows at http://pathaway.com/convert.htm,
or use a third party app such as QuoVadis(Touratech-QV) or Fugawi. See http://pathaway.com/links.php
for map tools and sources.
For Data, PathAway supports GPX, KML, KMZ, and PathAway delimited
format.
To get PathAway maps and data into PathAway, there are a number of
ways:
Method 1. Copy maps and data from your PC to your
device.
- On your PC or Mac locate the data files using your file utility
(Explorer or Finder)
- Select and copy the data files to the clipboard.
- On the device, under main menu "Settings->Applications->USB
Settings", ensure "Mass storage" is on (or Ask on connection)
- Connect your USB cable between your device and PC.
- Your device should be mapped to a drive letter on your PC.
- Choose a temporary location on the device, and paste your data files
there. Note: If you are copying maps, you can copy them directly into
your <Device Storage>PathAway folder. When PathAway runs, it will find your maps in
these folders.
Importing into PathAway:
- Run PathAway on your device.
To Import Points, routes, and tracks in GPX,KML,KMZ, or PathAway format:
- Select "Data->Import". (Note, for Maps you can simply copy the
maps into a registered PathAway folder. The Import command for maps
simply copies to the <Device Storage>/PathAway
folder)
- Select "Local File".
- Choose the file to Import, and select "Ok".
- Data files can be accessed by
selecting the appropriate "Data" menu options. Note that KPX and KM* files have tracks, routes, and points inside a single file. These will be seperated out in PathAway into the appropriate data file type (Points/Routes/Tracks).
To Import Maps in PathAway or BSB/KAP format:
- Select "Data->Import". (Note, for Maps you can simply copy the
maps into a registered PathAway folder. The Import command for maps
simply copies to the <Device Storage>/PathAway
folder)
- Select "Local File".
- Choose the file to Import, and select "Ok".
- Once completed, new maps will be accessible by "Zoom in or out", or
by selecting the "Maps->Custom Maps" dialog.
or
Method 2. Email the files to yourself on your device.
Files can be zipped up together for batch import. Then in your email,
"Open" the attachment and save the data file to your device. Follow the
"Importing into PathAway" steps
above to complete the import.
or
Method 3. You can place the maps and data files on a
Web server or File Sharing service such as iCloud or SkyDrive and
"Open" the data directly from the mobile browser. Follow the "Importing into PathAway" steps above
to complete the import.
or
Method 4. Use an application such as "Dropbox" to copy
your files into your device. Follow the "Importing into PathAway" steps above
to complete the import.
Location Sharing
PathAway PRO provides the ability to securely share your location with others so you can view their location on their device, and you can view theirs. This feature is very useful for applications such as group travel where you need to see where others in the group are; search and rescue, where searchers need view the positions of other rescuers.
For location sharing to work, the devices must transmit the location data over the internet. This includes via cellular data or WIFI. Note: PathAway Support does not provide assistance for obtaining data connections.
Location Sharing also requires that you create a PathAway Account to uniquely identify you with others, and to store your locations. When you send your location, it is securely posted to our servers, where it will be retrieved by others that you have chosen to share with. Only those that ypu approve to share your location with have access to your location records.
Sharing Locations With Others
To setup location sharing, go into the menu option Location Sharing->Share With....
In this dialog, you can add the other people that you want to share with. To add a new person to share with, click the "New" button on the bottom toolbar.
Next, enter the email address of the person you want to share with. You can access your "Contacts" on your device to quickly add and email.
After
PathAway will transmit the location in the background. When PathAway has completed sending it will return either “Location Send Successful” message on the bottom of the screen, or will return an unsuccessful message.
If the send fails, check the error message received and attempt to resolve the problem. If there is not enough information, you can check the log file in your <default>\PathAway folder. It is entitled “PathAwaySendLog.txt”. This log file contains a dump of the data being sent.
You can have your location sent at regular intervals by turning on the “Automatic Send Location” feature. This is done via Location Sharing->Auto Send command. The frequency of when to send can be set in the "Share Settings" dialog.
You can also simply send your location manually by issuing the “Send Now” command.
You can retrieve the locations of the people you're sharing with at regular intervals by turning on the “Automatic Location Retrieve” feature. This is done via Location Sharing->Auto Retrieve command. The frequency of when to retrieve can be set in the "Share Settings" dialog.
To retrieve your shared locations manually press the “Retrieve Now”.
Monitoring Remote Locations
Viewing Shared Locations
Once you have retrieved other user's locations, they will be displayed on the map with an icon showing their direction of travel along with a flag showing their details. The amount of detail can be controlled in "Share Settings" dialog under "Map Display".
The retrieved locations can also be viewed in the "Locations Received" dialog. Here all the locations you have are listed. You can control which ones you want to display on your maps, or delete ones you don't want anymore.
If the retrieval is unsuccessful, then an error will appear on the status line. You can check the <device storage>/PathAway folder in the file “PathAwayReceiveLog.txt” to view the data log.
Reference
Navigation Screens (Screens Menu)
The main screens of the program are the navigation screens used for displaying maps, and other travel and location information. The screens are all composed of a map viewing area surrounded by a customizable “dashboard”. The dashboard can also be completely removed from the view by the View->Show Dashboard command. There are a number of different screens available for targeted use. They are shown as follows:
Full Screen Map View
Utilizes most of the screen to show as large a map area as possible.
Long/Lat, speed, elevation, and direction of travel are displayed. This
data is the “navigation” data in the program.
In this view, by default, the dashboard shows as follows:
Upper left: Elevation
Upper Middle: Course
Upper Right: Speed
Bottom Left: Location, overlaid by Proximity and Alarm information.
Bottom Center: Current Time
Bottom Right: Map Range
Tracking View
Shows the map and navigation data. Default travel stats are related
to information specific to your current trip. Default settings are:
Upper Left: Elevation
Upper Middle: Course
Upper Right and down: current, average, and maximum speed.
Left side: trip time and distance (odometer)
Route View
Shows the map and “navigation” and "tracking" data, plus info for
proximity to route points. As you approach a point, “Estimated time to
destination (ete)”, “Distance to destination” and “Course to next
point” are displayed. Note, there are other Route details that can be
configured to show on the screen. See the Dashboard setting options.
Compass View
Shows the navigation Compass and selected “navigation” data.
The Compass view is customizable. The screen can display data in a “Tiled” format, or a single Compass in full screen.
By Default, the Compass view shows the following information by default:
Top-Left: Heading Compass
Top-Right: Next Point navigation Compass
Left under heading Compass: Primary Location Coords.
Plus: Time, Date, Speed, Elevation
Profile View
Shows Elevation and speed profiles for the current Route or Track Log.
Green Shaded area is the elevation profile. Double Vertical line
indicates the current position relative to the current route position.
Modify the settings for the Profile View using the
Settings->Profile View dialog.
Weather View
Overlay forecast weather data on your maps with clear visualization or animation. The Weather Forecast Overlay feature contains a set of Free Overlays, as well as a premium subscription service option. Weather Overlay subscriptuons can be acquired by purchasing within the App and creating a PathAway account Weather Data is provided through from NOAA Global Forecast System, and delivered by Theyr Weather Service.
Data types include Wind Speed and Direction, Air Pressure and Temperature, Precipitation, Wave Height, Atmospheric pressure, and Multiple-WPPT which combines Temp, Precip, Wind, Pressure in a single overlay.
When you first select the Weather View, a dialog will come up asking to "login", "Subscribe", or "Try it". Press "Try It" to experience the free sample of Weather Overlays. Press "Login", if you have already created a PathAway account and have purchased the Premium Weather Subscription . Otherwise press "Subscribe" to create a PathAway account, and purchase a Weather Overlay Subscription. Account and Subscription options can also be reached from the Settings Dialog.
The weather view contains a control bar for selecting Weather type, refreshing current forecast, performing time forecast animation, and setting transparency level of the weather overlay.
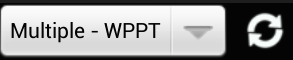

For screens that are not wide enough to display all the controls, Press the Down Arrow
 at the top-left of
control bar to scroll through the options.
at the top-left of
control bar to scroll through the options. Main Menu
The Left command button titled Options, is the main menu for access to commands in PathAway. The following menus are available from all Navigation screens.
Navigate:
Options for navigating routes with the GPS, simulating routes, and controlling and
resetting trip data.
Tools:
Tools for creating and editting routes, measuring distances, and calculating areas.
View:
Options for setting visibility of items on the screen, such as maps, dashboard, toolbars.
Screens:
The main screens of the program are the navigation screens used for
displaying maps, and other travel and location information.
Maps:
Options for viewing, downloading, importing, and edtting maps and charts.
Data:
Options for viewing, importing, exporting, editing, and using tracks, routes, points.
Location Sharing:
The Location Sharing menu contains commands for sharing your locations with others. Others can view your
location directly on their device within the PathAway App. You can also
setup your handheld to retrieve the locations of others.
Find:
Options for finding locations by address or location, or centering maps on current route or track.
Zoom Map:
Contains map zooming and map selection options for maps.
Rotate Map:
Contains rotation options for maps.
Settings:
Configure different Settings for program to match how you want the
program to work.
Selection:
Brings up the context menu for the currently selected map item (same as
tap and hold on the map screen). If there is no current selection it
then selects the current GPS location.
Help:
Launch the program manual.
Menu->Navigate
Options for navigating with the GPS, simulating routes, and controlling and resetting trip data.
Use GPS
Toggles the GPS on and off. When the GPS is connected and has a fix
on your location, the current location will be displayed in the center
of the map screen. An Arrow will show your current direction of travel. Note that Use GPS only shows your current location and does not track your progress or provide navigation guidance.
Use the Tracking options to record your trips, and Route options for navigating.
Simulate GPS
Simulates a navigational trip by centering the map to the current route
points in sequence. The simulation moves one point at a time
approximately every second until the end of the route is reached.
Start New Trip...
Start a new trip. Options to start with a new track log, or
continue adding to the current track, and choose a new route to follow.
Reset…
Options to Clear the track log, reset odometer. Next connection will
start with a new track log.
Menu->View
Options for setting visibility of items on the screen.
Show/Hide WebMapsOn Show WebMap:
Show the map most closely matching current position and zoom setting.
On Hide WebMap:
If one of your WebMaps is displayed on the screen, it will be hidden and the blank virtual map will be displayed. If "Show Custom Maps" is on, and "Auto Select Maps" is on, then the custom map with the closest resolution will be displayed.
Show/Hide Custom Maps
On Show Custom Maps:
Show the custom map most closely matching current position and zoom
setting.
On Hide Custom Map:
If one of your custom maps is displayed on the screen, it will be
hidden and the
blank virtual map will be displayed. If "Show WebMaps" is on, then the
WebMaps with the closest resolution will be displayed.
Show/Hide Points…
Toggles display of "Points" on the maps.
Map Display…
Options to control what information and layers are displayed on the
maps. This includes automatic map selection, track and route
lines display, North Arrow, Point Icons and Text, Font Size
Show/Hide Dashboard
Turn Dashboard On/Off.
Default Dashboard
Restores original Dashboard for current screen.
Show/Hide Toolbar
Turn Bottom toolbar /on/off. When the toolbar is hidden, you can access
the toolbar by tapping on the bottom of the screen (between dashboard
items)
Menu->Screens
The main screens of the program are the navigation screens used for displaying maps, and other travel and location information. The screens are all composed of a map viewing area surrounded by a customizable dashboard. The dashboard can also be completely removed from the view by the Options->View->Show Dashboard command. There are a number of different screens available for targeted use.
Full Screen Map View
Utilizes most of the screen to show as large a map area as possible.
Long/Lat, speed, elevation, and direction of travel are displayed. This
data is the “navigation” data in the program. This is the default
screen upon first-time program startup.
Tracking View
Shows the map and navigation data. Default travel stats are related
to information specific to your current trip.
Route View
Shows the map and “navigation” data, plus full info for point
proximity. As you approach a point, “Distance from” and “Course to” are
displayed.
Compass View
Shows the navigation Compass and selected “navigation” data. The
Compass view is customizable. The screen can display data in a “Tiled”
format, or a single Compass in full screen.
Next Screen
Displays the next screen in the list. The screens are order in the
same order as shown in the menu
Previous Screen
Displays the previous screen.
Menu->Maps
Options for viewing, importing and editing maps and charts.
WebMaps...
Management of Downloadable Maps from the Web. Maps can be downloaded
via various Web Map Servers. This option allows you to choose which
service to use and whether to automatically download maps for the
viewable area of the map.
Menu->Data
Options for viewing and editing tracks, routes, points, and maps.
Points...
Management of Points. Shows list of points. Options to Create new
points, delete, edit individual points, Sort, find, and go to selected
points on map. Beam points to others.
Routes...
Management of Routes. Shows list of routes. Options to Create new
routes, rename, delete, edit route points, duplicate, join 2 routes
together. Beam route to others. Select a route to display on the map.
Tracks...
Management of Tracks. Shows list of recorded tracks. Options to
rename, delete, edit track points, duplicate, join 2 tracks together.
Beam tracks to others. Select a track to display on the map.
Point Databases...
Management of Points databases. You can store points in multiple
databases and show/hide databases.
Menu->Find
Options for finding locations or centering map on the current route or track.
Find Location
Search for a location by address or geographic coordinates.
Go to Start/End of Route
Moves location to the start or end of the active route.
Go to Start/End of Track
Moves location to the start or end of the active recorded track.
Zoom Map
Contains zooming options for maps.
Map Zoom In
Zooms into the next map under the selected location. When the Map Zoom
In is checked, it means there is a higher resolution map at the current
location. Pressing this button, will show this map on the screen. If
unchecked, then the view will zoom in to the WebMap, or virtual map
view where no map is shown on the screen. If there is no active map,
this button performs a Scale Zoom In.
Map Zoom Out
Zoom Out to another Map. When the Map Zoom Out is checked, it means
there is a lower resolution map at the current location. Pressing this
button, will show this map on the screen. If unchecked, then the view
will zoom out to the WebMap, or virtual map view where no map is shown
on the screen. If there is no active custom map, this button performs a
Scale Zoom Out.
Scale Zoom In
Expands the pixels of the current map to show a close up view of the
area.
Scale Zoom Out
Shrinks the pixels of the current map to show a wider view of the area.
Choose Map…
Brings up list of all available Maps within the current location
bounds. Select the map name to display it on the screen. The indicators
beside the map name show whether the map is a higher (+) or lower (-)
resolution. The (*) indicates the map is the same resolution as the
current map. You can also choose "WebMap/No Map" to
display either a WebMap or the blank virtual map screen if no WebMap is
available or if WebMaps is turned off.
Scale 100%
Draws the map in its original scale. Applies only to PathAway Custom
maps.
Selection Menu
Provides access to the context menu options available at the current
map screen center. This is equivalent to tap and hold on the center
of the map and brings up the context menu for a list of options
avaialble on this location. See the Context Selection
Menu. Selection menu
Context Sensitive - Selection Menu
You can select and control areas on PathAway screen by bringing up a context menu depending on the item selected.
To select an item on the map:
- Tap and Hold on the map brings up the Map Selection Context menu.
- Tap and Hold on a dashboard item brings up the Dashboard menu options.
Map Context Selection Menu
Selecting an area of the map brings up the top level Context
Selection menu
Selecting an existing point will display the current location
coordinates, the closest point name. Selecting an empty area of the map
will display only the current location
coordinates.
The following menus are activated when you tap and hold on an area of the map, or if select the Main menu->Selection command. The menus are organized into multiple layers for easy navigation. The first menu is the Top Level.
Map Selection Menu - Top Level
<Current Location>
Displays the geographic coordinates of the selected location
<Closest Point> >
Select the item to display a list of commands to operate on the
selected point.
Deselect
Deselects the currently selected location and clears the flag on
the map.
Add Point…
Adds the selected location to the Points database. Calls up Edit
Point dialog for naming and selecting icon.
Add Route Pt
Adds selected location to the route.
Center Map
Centers map at selected location.
Route Menu >
Display the Routing commands available.
Tracking Menu >
Display the Tracking options available.
Map Selection Menu->Closest point
Contains location sensitive options for the currently selected point. Show details of point, edit the point, or delete it.
Details…
Displays a screen showing detailed information about the point,
such as distance to, ETA to, etc.
Show Notes…
Displays only the name and text description of the point.
Displays the picture associated with the selected point
Edit Point...
Displays the Point Edit dialog for the selected point.
Allows adjusting the location of the selected point by tapping it's proper position on the map.
Delete Point
Deletes the selected point from the Points database.
Map Selection Menu->Route Menu >
Shows the Routing options available at the current location. If a Route Point is under the location clicked on, then options for this point are shown.
<Route Name>
Displays the name of the current route, if any
Add Route Pt
Adds selected location to the route.
Delete Route Pt
Removes the specific point selected from the active route. Point
remains in point database if there already.
Follow Forward
Activate the selected Route to follow from the start.
Follow Reverse
Activate the selected Route to follow in reverse order starting at
end point of the route
New Route…
Create a new route
Map Selection Menu->Tracking Menu >
Shows the options available at the current location for the Active Track Log. If a Track Log Point is under the location clicked on, then options for this point are shown, otherwise, only options for the Active Track log are shown.
<Current Track Log>
Displays the name of the current track log.
Follow Forward
Activate the selected Route to follow from the start.
Follow Reverse
Activate the selected Route to follow in reverse order
starting at end point of the route
Suspend/Resume Tracking
Suspends or Resumes recording positions to the current track
log.
Show/Hide Track Log
Shows or hides the current track log on the map
Tracks...
Go to the Tracks dialog to choose other Tracks. Same as
selecting the main menu Options - Tracks...
Dashboard
The area of information and trip statistics is called the Dashboard. It is sizable and scrollable so you can easily get to the info you want and to control how much you see on the screen at one time. Swipe it to scroll, drag the handles to size. Double tap on any dashboard item to change its type and font. Tap and hold on a dash item to drag and move the item.Dashboard Context Menus
Customizable Dashboard Options allow you to see the information you are most interested in. Each of the PathAway screens can be customized differently. This allows you to quickly change to a view most appropriate for navigating.
Double Tap on a Dashboard item allows you to have different
information displayed at the dash location tapped on. This brings up the DashItem Edit dialog where you can set
the data type, and font size.
On Top or Right tiled dash style, Tap and Hold then Drag on a Dashboard item to move it to a new location on the dashboard.
The Tiled Dashboards are organized from left to right to fill the screen, then the rest of the items are offscreen and can be scrolled to in order to view them.
/
Note: With the dash in Overlay Mode, if no information
is selected for a Dashboard, or there is no information available, then
a small bar is displayed. Clicking on the bar will also bring up the
Dashboard menu.
The following describes the Dashboard menu options.
Show/Hide
Removes the currently selected info from the selected Dashboard. If
it is hidden, then it can be re-shown.
Tracking Info >
Routing Info >
General Info >
Sub-menu option categories. See each item description below.
Set Font...
Set the primary font for the currently selected item. Brings up the
Set Font Dialog
Dashboard Item - Set Font Dialog
Dashboard items all consist of 2 potential lines. Set the font size desired for the top and bottom lines of the selected dashboard item.
Dashboard - Tracking Info >
Dashboard Item info for tracking state and GPS Information. Includes speed, location, and time info
GPS Status
Shows GPS Status (Same as on Toolbar). Tap on this item to Use the
GPS.
Heading
Shows current Heading (course) direction. For slow speeds or when
stopped, PathAway will switch to the internal magnetic compass to
determine heading.
Elevation
Shows current Elevation.
Speed
Shows current rate of speed.
Location Coordinates
Shows current position in the Primary Coordinate setting.
(Options->Settings->Coords)
Secondary Coordinates
Shows current position in the Secondary Coordinate setting
(Options->Settings->Coords)
North Arrow
Displays a compass showing N,S,W,E and a North Arrow.
Trip Dist (odo)
Distance traveled since start of Trip (first GPS fix).
Elapsed Time
Elapsed time in minutes since start of Trip (first GPS fix).
Average Speed
Average speed since start of trip.
Max Speed
Maximum speed obtained.
Vert Speed
Displays the vertical rate of climb or descent.
Pace (Time/Dist )
Displays the current Pace (Time per Distance) value. This is the
speed at which it will take you to cover a single distance unit. I.e.
If you are using Metric units, this is the time to travel one
Kilometer. This feature is useful for time/speed training and racing
data.
Avg Pace (Time/Dist)
Displays the current Average Pace (Time per Distance) value. This
is the average Time it has taken to cover a single distance unit. I.e.
If you are using Metric units, this is the average time to travel one
Kilometer. This feature is useful for time/speed training and racing
data.
Proximity
Displays the proximity information to the closest point.
Dashboard - Routing Info>
Displays information regarding the current Route being followed. These items are only valid if following a route.Off Track Warning
Displays distance and
position off the route track.
Elevation Warning
Displays distance and position from the elevation recorded at the
current route position in the
active route database.
Time to Dest (ete)
Estimated amount of time to
reach destination.
Arrival Time (eta)
Estimated time of Arrival at
destination.
Dist to Dest (dtd)
Distance to destination
along route.
Heading Direct to Dest
Displays the heading direct
to the route destination point.
Dist Direct to Dest
Displays the straight line
distance direct to the route destination point.
Follow Heading
Follow this course to reach
next leg point.
Dist to Next Point
Distance to next route leg
point.
Time to Next Point
Estimated time to reach next
leg point.
Vert Dist to Next
Displays the vertical
distance in elevation units to the next point on the route.
Vert Angle to Next
Displays the vertical angle
to the next point as expressed in degrees
Heading on Next Leg
Heading to follow after next
point in route is reached.
Dist of Next Leg
Distance to next leg point
after next point.
Time on Next Leg
Estimated time on next leg
point.
Dashboard - General Info
Miscellaneous information.
Time
Current Time. Displays time from the Handheld, when not connected
to GPS. GPS UTC + time zone offset when
connected to GPS.
Date
Displays the current date
View Range
Map View range distance.
Horizontal distance from left to right side of screen.
Battery Status
Battery
charge status expressed as a percentage %.
Free Memory
Displays the amount of available memory.
Dialogs
Settings Dialog
Settings for options such as units of display, track recording options, map display options, time estimation settings, hard key settings, map and dashboard colors, routing options etc. The Settings dialog is organized by separate dialog panels. Select the panel of choice from the list.
Settings->General
Distance:
General settings for speed and distance units of measure. Choose from
Statute Miles, Nautical Miles, or Kilometers.
Elevation:
Settings for elevation and short measurement. Choose from Feet,
Metres, or Yards.
Course:
Settings for the display of Heading and directional course. Choose from
simple N,S,W,E, to more detail such as NE, and NNE, to decimal degrees.
Settings for type of directional compass. Options are True course which refers to True North, or Magnetic North which is calculated based on estimated magnetic declination from the current location.
Area: Settings for total Area. Can be in Square Metres, Sq Feet, Sq Yards, Sq Kilometers, Sq Miles, Sq Nautical Miles, Hectares, or Acres.
On Startup:
Use GPS on Startup:
Automatically connects the GPS on program startup. If not selected,
then the GPS will need to manually enabled by pressing the GPS icon,
GPS Tracking icon, or the menu Navigate-Use GPS button.
With GPS Connected:
Run in Background:
Keeps tracking with the GPS in the background after pressing the Home
button. Warning: This option will consume more battery power. This
feature may not be available in all devices.
Keep Backlight On:
Keeps the backlight of the screen from dimming while navigating with
the GPS. Warning: This option will consume more battery power. This
feature may not be available in all devices.
Confirm Shutdown:
When the Back key is pressed, selecting this option, will bring up a
confirmation dialog to allow you to choose from the following options:
- Exit and shutdown the App. The GPS tracking will be shut down and the
program will exit and be removed from memory.
- Minimize the App. Close the App and return to the main Launcher
screen. The App will be put into Background mode. If Background
Tracking is enabled, PathAway will continue to Track in the background.
Otherwise, the App may be eventually terminated by the operating system
since it is no longer in use.
- Cancel. Returns the App to its Main Screen. Press Cancel if you
inadvertantly press the Back key too many times exiting from the
dialogs.
Settings ->Primary Coordinates/Secondary Coordinates
Define the geographical coordinate display format and datum. Latitude/Longitude, UTM, OSGB, MGRS, or other national grid. Primary coordinates are used for all display and location editing. Secondary Coordinates are used for location info, and optional Secondary coordinate display on a dashboard item.
Position:
Define the geographical coordinate display format.
Latitude/Longitude, UTM, OSGB or other national grid.
Datum:
Specify the Datum to use for the coordinates. Most popular datum is
WGS84.
Settings->Map Display …
Control what layers are displayed on the maps.
Show Custom Maps:
Display maps on the navigation screen. When not selected, navigation
can be done by the virtual map, which will still place your recorded
points on the screen based on the current zoom factor.
Show North Arrow:
Display a symbol on the map indicating direction to TRUE north. The
arrow is display in the top left quadrant of the screen.
Show Active Track:
Show the currently active track log line. By default, the track log is
shown in blue.
Show All Enabled Tracks:
In the Data-Tracks dialog, you can select the "Show" button, and select
which Tracks to always display on the screen. This option allows you to
turn them all On or Off in order to have a clearer view of the map
below it.
Show All Enabled Routes:
In the Data-Routes dialog, you can select the "Show" button, and select
which Routes to always display on the screen. This option allows you to
turn them all On or Off in order to have a clearer view of the map
below it.
Show Active Route:
Show/Hide the track line of the active route being followed.
Show/Hide the line from the current location to the next point.
Line to next turn:
Show/Hide the line from the current location to the next turn instruction.
Circle next point:
Show/Hide the circle showing the Route Target Proximity Radius around the target point.
Circle next turn:
Show/Hide the circle showing the Route Target Proximity Radius around the target turn instruction point.
Show Track Name Labels:
Show the name of all the tracks and routes that are displayed on the
map screen.
Show Time Radials:
Shows circle on map indicating the time it will take to travel to
locations on the map. Configurable in the Settings->Radials dialog.
Show Distance Radials:
Shows circle on map indicating the distances to locations on the map.
Show Points:
Show the recorded point icons and/or labels on the map screen.
Show the point icons. When you zoom out you can specify the threshold when the icons are not to be displayed. This is useful to avoid screen clutter when viewing wide areas. Icons can be displayed in Normal, or double (large) size.
Show Text Labels:
Show the point text labels. When you zoom out you can specify the
threshold when the text is not to be displayed. This is useful to avoid
screen clutter when viewing wide areas.
Highlight Closest Point:
Show label, distance to, and pointer to the closest point in proximity.
You can specify to show the point name (label), distance from current
location, and heading from the current location. The following are
options for the type of information displayed on the Closest Point Tag.
Display the name on the Closest Point flag.
Show Dist:
Display the distance to the closest point from the current position.
Show Heading:
Show the heading in degrees to the closest point.
Menu Text Normal/Large Text:
Global setting to display normal or large text for popup menus. The
large text option is useful for arms length viewing, and finger
selection.
Show Dashboard:
Show or Hide the Dashboard
Global setting to show text in different sizes. When large text is selected, each font on the dashboard is expanded by one size. When small text is selected, each font is reduced by one size.
Show Toolbar:
Show or hide the toolbar on the main screens. When the toolbar is
hidden, you can access the toolbar by tapping on the bottom of the
screen (between dashboard items
Settings ->Profile View
Settings for the Elevation/Speed Profile View screen. Options are:
Tracking View:
Show the profile for the current Track Log. If there is no current
track log, the screen will default to the current route.
Route View:
Show the profile for the current route being followed. Note: The route
must have some Elevation data for the profile to show. If you are
following a Track Log, it will have elevation data. If there is no
route available, the screen will default to the current track log.
Show Speed: Toggle the Speed Profile On/Off.
Show Elevation: Toggle the Elevation Profile On/Off.
Settings ->Tracking
Set track recording Settings. Allows you to Control how often position data is logged to the Active Track Database log.
Record Track History:
Saves recorded GPS location to a logging database while connected.
Track Recording Interval:
Record By Time or by Distance. Options will change
depending on the selection.
If Record By Time is selected:
Time Intervals:
Record track log point at time interval offsets. Set to Constant
to record as often as the communications speed and device performance
will allow.
If Record By Distance is selected:
Record By Distance:
Select the distance intervals to record track points at. PathAway will
record a track point at specified distance traveled markers.
Elevation Correction:
Some GPS receivers interpret the elevation/altitude in different ways.
This may require a correction to be applied depending on your locale.
Entering a positive value will add an amount to the recorded and
displayed elevation. A negative value will subtract.
Settings ->Alarms
Have audible alarms sound when you reach points of interest, or get off your route track. Set the distance threshold for the proximity point, and choose from one of the predefined alarm sounds.
All Alarms:
Enable/Disable alarms
Edit Alarms:
Customize the sounds played for each alarm. Choose from many
built-in sounds or select an external sound file as the alarm.
Off Track Warning:
Set the Off Track warning alarm distance, and sound. This alarm will
sound when you veer from the specified track by the off track distance.
The Off track alarm will continue to sound every 30 seconds while
off-track.
Off Track Left/Right:
Sound different alarms to indicate whether you are left or right of the track. Setting these checkboxes override the default off-track sound.
Proximity Approaching and Reached:
Proximity alarms can be set to alert you at two separate proximity
distances. Different sounds can be set to notify you of when you are
approaching points.
Turn Instruction Approaching and Reached:
Turn instructions can be created by setting a route point to be an
Intersection. The Turn alarm settings will sound as you approach turns.
Note, turns are set by selecting “Add Turn Instruction” when adding
routes, or by editing a Route point and selecting the “Intersection”
icon for the route point.
Turn Left/Right: Sound different alarms to indicate a left or right turn. Setting these checkboxes override the default turn instruction sound.
Altitude Warning:
Defines vertical distance of track route you can get before Elevation
too low or too high warning is triggered. Route being followed must
contain Elevation data.
Altitude Too High/Low: Sound different alarms to indicate whether you are too high or too low from your target altitude. Setting these checkboxes override the default Altitude warning sound.
GPS Fix Acquired/Lost:
Alarms that sound when a GPS fix is first acquired, or when the signal
is lost.
Remote Location Notifications:
Sound alarm when a new remote location is received or when your
location is successfully sent. Or set different alarms when a send or
retrieve fails.
Location Send Notifications:
Sound alarm when your location is successfully sent. Sound a different
alarm if the location send fails. Location Receive Notifications: Sound
alarm when a new remote location is received or when a location
retrieval fails. The failure alarm applies only to the Http-based
Location retrieval.
Settings->Alarms -> Edit Alarms
Set the distance threshold for the proximity, and choose from one of the predefined alarm sounds, or select a custom sound of your own.
Alarm: Choose the type of alarm to modify.
Distance from Target: The distance value that must be reached in order to trigger the alarm. Each trigger is different depending on the type. For Proximity and Turn Instructions, the alarm will sound when you get closer than the specified target distance. Of Off-Track and elevation warnings, you must be further away (or above or below) from this distance for the alarm to sound.
Sound: Set the warning alarm sound. Choose from the pre-defined sounds, or from a sound file of your choice. Press the “Play Sound” button to test the sound.
Settings ->Radials
Configuration options for the display of time and distance radials on the map.
Show Estimated Travel Time Radials: When enabled, a circle will be drawn on the map for each specified radial value showing the estimated time to reach the area of the map.
Range Time Radials (minutes): PathAway can display the estimated travel time graphically on the map via special range radials set a specific minutes. Each ring shows the estimated time to reach a certain portion of the map. Ie. If the first setting is set to 1 minutes, then there will be a ring shown on the map indicating where you will be in one minute. To adjust the time radials, enter the minutes for each radial separated by a comma. Note: Turn the radials on/off in the View->Map Display dialog.
Show Distance Radials: When enabled, a circle will be drawn on the map for each specified radial value showing the distance to the area of the map.
Range Distance Radials: PathAway can display the distances graphically on the map via special range radials set a specific distances. Each ring shows the estimated time to reach a certain portion of the map. Ie. If the first setting is set to 1 km, then there will be a ring shown on the map indicating 1 km from the current position. To adjust the radials, enter the distance for each radial separated by a comma. For values less then whole numbers, enter the decimal point distance value. Ie. 0.5 Note: Turn the radials on/off in the Settings->Map Display dialog.
Settings->Position Marker
The Position Marker is the Arrow or cursor in the center of the screen. It represents your current geographical position on the map. If you are navigating with a GPS, it points in your direction of travel. If you are disconnected and following a route, it will point in the direction to the next point in the route. You can set the style of direction pointer in the Position Marker Style dialog. In the Position Marker Style dialog, you can choose the desired Direction Arrow style, color, and size of the marker. For more emphasis on screen, set the 3d Effect to create a shadow behind the marker.
Settings->Dashboard
The Dashboard dialog allows you to to adjust the colors of the user interface elements such as menus, toolbars, and dashboard. As well, you can change the style of the Dashboard. The Dashboard styles can be set differently for both landscape and portrait display mode. Select the Settings category Dashboard to activate this dialog. Experiment with this option until you've found a view that suits you.
Settings->Colors & Lines
The Colors and Lines dialog allows you to to improve the visibility of the navigation displays on the map. Select the Settings category Color and Lines to activate this dialog. Here you can change the way the lines and colors on the maps are displayed. You can create easy-to-read contrast between your maps and route and track lines. Experiment with this option until you've found a view that suits you.
Active Route: Set the color and width of the Active route line. Can set whether to show each route point mark as well. Brings up Line Style dialog.
Line to Next Point: Set the color and width of the line from the current position to the next point on the route. These are shown when the preferences option "Show All Tracks" is on. Can set whether to show each route point mark as well. Brings up Line Style dialog.
Circle Next Route Point: Set the color and width
of the circle for the next point on the route. Brings up Line
Style dialog.
Other Routes: Set the color and width of the
non-active Route lines. These are shown when the preferences option "Show
All Tracks" is on. Can set whether to show each route point
mark as well. Brings up Line Style dialog.
Active Track: Set the color and width of the Active track log line. Can set whether to show each track point mark as well. Brings up Line Style dialog.
Other Tracks: Set the color and width of the non-active Track lines. These are shown when the preferences option "Show All Tracks" is on. Can set whether to show each track point mark as well. Brings up Line Style dialog.
Point Labels Text/Background: Change the display color and background of the point label text.
Point Icons: Change the default color used when Point Icons are out of range.
North Arrow: Change the display color of the North Arrow displayed on the map.
Settings->Time Estimates
Control how time-based estimates are calculated.
Time Estimates based on:
• Recorded Track Speed: Report to the exact time it took
previously on a followed track. Applies only when "Following" a
recorded track. If this option is disabled, then speed estimates will
be based on the "Then" settings
Then
• Current Speed: Estimates based on current speed. Set the
speed in the Custom Speed box.
• Average Speed: Estimates based on current average speed.
• Activity Average Speed: Estimates based on an estimated average speed
set for the current vehicle.
• Custom Speed: Estimates based on current speed. Set the speed in the
Custom Speed box.
Show Estimated Speed on Dashboard:
On the dashboard items that show estimated time data, this option will
display a symbol to indicate what it is basing its time estimate on.
Symbols are T=Track, S=Current Speed, V=Average Speed, A=Activity
Average Speed.
Settings->Routes
Route Preferences. Define preferences for navigating using routes.
Route Warnings
Off Track Warning: Defines distance to right or left of route track you can get before Off-track warning is triggered.
Elevation Warning: Defines vertical distance of track route you can get before Elevation too low, too high warning is triggered. Route being followed must contain Elevation information.
Route NavigationFollow Routes in Sequence: By Default, PathAway targets the Next Route point by determining the closest route point in the direction of travel. This might not be the most desirable method for navigation since, some routes my crisscross, or loop back. Or perhaps, the route requires a grid pattern to be run. In this case, the Follow Routes in Sequence can force PathAway to Target only the Next Point after the current target point, when it reaches the Route Pt Proximity Radius.
Route Pt Proximity Radius: This specifies the criteria for determining when a Route point target has been reached. The wider the radius setting, the sooner the PathAway will move onto the next route point target.
Manual Route Advance Only: In certain cases, it may be required that the Route target point be advanced manually. If Manual Route advance is enabled, then PathAway will stay fixed on the target route point until you specify Advance Route Target Point
Settings->Point
Preferences related to the display of points and naming of new points.
In Proximity when within:
Defines the radius to search for points to display in proximity list.
Auto Point Naming:
Define how new points are auto-named. Points can be
automatically named by geographical coordinate or be incrementing
numeric ids.
Point View Width: Set the map display range threshold for when to display the icons and text labels. When zoomed out to a range higher than these settings, the icons will be shown only as dots, and the text will not be displayed. Note, the icons and text can be turned on and off completely in the “Settings > Map Display” dialog.
Settings->Folders
The Folders dialog allows you to specify the file folders that PathAway uses to look for Custom Maps. By default, PathAway uses folders on the main storage area, and looks for storage on an external SDCard. Note that some devices reference folders and sdcard's differently so PathAway may not initially find the correct folders. This can be modified in the Folders Settings.
On first time startup, PathAway enumerates the folders as follows:
- Registers <Personal Folder>\PathAway folder. The actual name of the <Personal Folder> is resolved in the device registry. It is usually called "/mnt/sdcard".
- Searches and registers a "PathAway" folder in all storage cards found. If the storage car does not have a "PathAway" folder, it will be created.
Subsequent startup:
- Storage cards are not automatically searched for. They must be registered via, the Options-Folders dialog.
- Card Insertion/Removal. Will automatically register cards inserted while PathAway is in use.
Folders Menu Commands:
Add Folder...: Register a new folder. PathAway will
look for databases in the new folders. Note, PathAway does not search
for databases in sub-folders.
Delete Folder: Removes a folder from the Folder
Enumeration list. PathAway will no longer search for databases in this
folder. Note, the default folders cannot be
removed.
Settings->Folders->Add Folders
This dialog allows you to add and remove PathAway folders. Simply
Check the folders you want PathAway to look for databases. Uncheck
folders to remove them from the enumeration list. Note, the <Personal
Folder>\PathAway folder cannot be removed.
To select new folders, turn On the checkbox beside the folder name. To
open a folder to view its contents, tap on the folder name.
New Folder: Create a new folder. Edit the folder name
and press OK to apply the name. Once the folder is created, it will
appear in the folder selector list and you can check it off.
Settings->Register
*For PathAway.com version only*. When you purchase, you are provided with a registration key based on the UID of your device. This screen you can enter your registration key to unlock the trial version for full use, or to retrieve your registration key if you need to upgrade the application.
Settings->My Accounts
For Subscription Services, you will need to create a PathAway
account.
Login to your accounts here in order to activate the subscription
services you have purchased. If you don't have an account, you can
enter this dialog to register for a new one.
New Account: For creating a PathAway.com accoun.
Forgot Password: To reset your password in case you forgot it. You will receive an email with a link to reset your password.
Settings->Weather Forecasts
Subscribe or view current Weather Forecast subsciption.
To subscribe to premium weather forecasts, you can choose a monthly or annual premium subscription, and choose Subscribe to go to a secure purchase page to complete your subscription purchase. If you already have a premium subscription, you can unsubscribe here. If you unsubscribe, you subscription will expire at the next billing cycle.
Navigate Menu Dialogs
Dialogs from the Navigate menu bar.
>Navigate->Start New Trip...
For selecting route and track recording log options before beginning a trip. This dialog requires that you have previously defined or recorded the routes or points you are going to use for navigation.
Follow Active Route:
To navigate in PathAway you must choose to Follow a Route, Track
log, or a stored Point.
A Route is a series of points that create the line that you will follow
while navigating. You can choose a recorded Track Log as well to
follow. Finally, you can choose a Point and navigate directly to it.
When you start navigation, select whether to use your Active Route to
follow for navigation. If you have no route selected, this option will
be disabled.
Record to Track Log:
Turn on or off track recording. Choose to create a new track log, or to
add to the current track database. If you choose new track, then all
travel stats will be reset. I. e. Odometer, travel time etc.
Reset Odometer / Start New Track Log:
Select Yes to reset the odometer to zero, and start a new
track log database to record to. This will automatically generate a new
track log name. To find this track log name, go to the Options->Tracks
dialog and look for the ‘*’ beside the track log details. By
default the tracks names start with “Track” and are followed by the
creation date and time. I.e. "Track 2009-09-05 15-51", means the track
log was created on Sept 5th 2009, at 3:51 pm. Select No
to Add to the Existing Track Log. If you are continuing
a trip, you can append to the current track log by selecting this
option. You can also choose this option and type in a new name for the
track log. This will create a new log and record your track records to
it.
Navigate->Reset...
For clearing the odometer and route in order to clear all the data.
Deactivate Current Route: Select Yes to turn Route Navigation off. Select No to leave it as is. If you deactivate a route, you can still start it up again by selecting it from the Track/Route or Points menu. Or by selecting a point on the map via map context menu and choosing “Add to Route”.
Reset Odometer / Start New Track Log: Select Yes to reset the odometer to zero, and start a new track log database to record to. This will automatically generate a new track log name. Select No to leave the odometer as is, and to continue appending to the current track
Data Menu Dialogs
Operations for viewing and managing all stored points, routes, maps, and recorded track logs.
Data->Points
Lists all points. Points may be stored in multiple databases. Select a point to view on the map, edit point information, delete, add new points.
List of Points: Select the point to perform a command on. The second line displays extra information about the point. You can change what is shown on this line via the Menu->Select Data command. Tap on a point to view it's details. Tap and hold on the point to bring up a menu of options to perform on the point.
Points Dialog - Toolbar and Main Menu
Tap and hold on the point to bring up a menu of options to perform on the point.
Edit
For selectively deleting points.
New Point...
Creates a new point. Will launch the Point Edit Dialog.
Search…
Dialog to enter the name of a point to search for. Search will
scroll to and select the point found.
Select Data > sub-menu
Control the Point Information displayed on the second line of the
Points list.
|
Location Coordinates |
Abbreviation Latitude-Longitude coordinates |
|
Latitude (NS) |
Latitude or Northing |
|
Longitude (EW) |
Longitude or Easting |
|
Grid |
Location Grid number (for grid-based coordinates such as UTM or OSGB) |
|
Elevation |
Recorded Elevation or Altitude above sea level |
|
Note |
1st line of the Notes field |
|
Time |
Point recorded time |
|
Proximity |
Distance to the point from the current location |
|
ETE Direct to |
Estimated amount of time to travel directly to point. |
|
ETA Direct to |
Estimated time of arrival directly to the point. |
|
Vert Dist to |
Vertical distance from current location to point |
|
Vert Angle to |
Vertical angle in degrees to the point from current location |
|
Leg Time |
Applies to track points only. Time between previous point and current point. |
|
Leg Dist |
Applies to track points only. Distance between previous point and current point. |
|
Leg Speed |
Applies to track points only. Speed between previous point and current point. |
|
Leg Time/Dist |
Applies to track points only. Time per distance (pace) between previous point and current point. I.e. min/km or min/mile. |
Points Dialog - Selected Point Context Menu
Show Details:
View Point details.
Edit Point:
For modifying the details of the selected point, such as name,
geographical coordinates, description, and icon. Launches the Point
Edit Dialog.
Add point to current route, or create a new route to this point.
Delete Point…
Deletes the selected point.
Show on Map…
Shows the selected point centered on the navigation screen.
Edit Point Dialog
Edit point name, geographic location, description, and choose an icon to represent the point on the map. This dialog is used whenever a new Point is added. New points can be added via the Add Point command from the Map Context menu, or from the Data->Points dialog.
Name:
Name for the point. Maximum length is 79 characters. All characters
except (commas and quotes) are valid.
Note:
Describe the point. Maximum length is 4000 characters
Point Icon:
Apply an icon to your point for easy identification on the map.
Media:
Attach a photo or video to the point. Take a picture or add from your
album
Longitude/Latitude:
Geographical coordinates for the point. See Entering Location
coordinates for information on how to enter location coordinates.
If your units are in other grids such as UTM, or OSGB, then the data
entry prompts will be Grid, Northing and Easting.
Elevation:
Altitude above sea level for the point.
Improve Accuracy - Pinpoint:
The Pinpoint feature will improve the accuracy of the
geographical location of the point by taking multiple samples and
average the top accuracy results to provide a more precise location.
This is done by Starting the PinPoint, remaining as stationary as
possible, then allowing the GPS to sample the location for a few
seconds. Usually, about 15 seconds of sampling is enough to obtain a
very accurate result, providing the GPS has a good quality fix.
Edit Point - Options Menu
Show on Map:
Center the map on the current point.
Add to Route:
Add point to current route.
Delete…:
Delete the point.
Data->Routes
Route management dialog. Lists all of your routes. You can create new routes, edit a route, or choose an existing route to follow forward or reverse. The current Route you are following is indicated in the rightmost column by an (f) for forward, or (r) for reverse.
To Select a Route to follow, or view it's details, select it from the list
Routes Dialog - Toolbar and Menus
Show
Select Routes to always display on the map. Thee routes are
referred to as "Other Routes". They can be toggled on/off entirely in
the Settings->Map Display dialog.
Select
Select multiple routes to perform commands on. When selected, a
checkbox will appear beside each route. Check the routes to perform the
action on. Commands are:
- Delete: Delete all Checked Routes
- Export: Export all Checked Routes.
Import
Import GPS/LOC/KML/KMZ or PathAway pw* files into PathAway databases.
Only data that contains routes will be shown in this dialog.
New
Creates a new route. Will launch the Edit Details Dialog.
Data->Routes - Selected Route Context Menu
Show Details
Displays details of the route, such as name, activity, number of
points, length.
Edit Details
For modifying the details of the route, such as name, activity, and
individual points. Launches the Edit Route
Database Details Dialog.
Follow Off:
Clears the Follow flag on the selected route.
Follow Forward:
Activate the selected Route to follow from the start. As you
travel, your current position along the route will be displayed.
Information such as ETA, Dist to Next point, Distance to destination
etc. can be displayed.
Follow Reverse:
Activate the selected Route to follow in reverse order starting at
end point of the route.
View Points...
View and edit all the route points in the Points Dialog.
Goto Start Location
Position the center of the map to the start of the selected route.
If the route is the active route being followed, it will be shown on
the map as well.
Delete…
Deletes the selected route.
New Route…
Creates a new route. Will launch the Route Database Details Dialog.
Export…
Exports the selected file to PathAway comma delimited format, GPX,
KML or KMZ. For routes the default extension is .pwrte.
Recalc Data
Analyzes and repairs the summary statistics for the route.
Data->Routes->Edit Details
For modifying the details of the route, such as name, activity, and individual points.
Activity: The activity the route is intended for. I.e. walking, biking cycling.
Folder: Name of folder route is stored in. (can’t be changed)
Name: Name of Route. Edit to change the name of the Route.
Description: Description of the route.
Data->Tracks
Lists of your recorded tracks. View Track details. Choose a track to follow for pinpoint accurate routing. Export Tracks to share with others.
Tracks Dialog - Tools Menu
Show
Select Tracks to always display on the map. Thee routes are
referred to as "Other Tracks". They can be toggled on/off entirely in
the Settings->Map Display dialog.
Select
Select multiple tracks to perform commands on. When selected, a
checkbox will appear beside each track log. Check the tracks to perform
the action on. Commands are:
- Delete: Delete all Checked Track Logs
- Export: Export all Checked Track Logs.
Import
Import GPS/LOC/KML/KMZ or PathAway pw* files into PathAway databases.
Only data that contains track logs will be shown in this dialog.
Data->Tracks - Selected Track - Context Menu
Show Details
Displays details of the route, such as name, activity, number of
points, length.
Edit Details:
For modifying the details of the track log, such as name, activity,
and individual points. Launches the Edit Track
Details Dialog.
Follow Off:
Clears the Follow flag on the selected track.
Follow Forward:
Activate the selected Track to follow from the start. As you
travel, your current position along the route will be displayed.
Information such as ETA, Dist to Next point, Distance to destination
etc. can be displayed.
Follow Reverse:
Activate the selected Track to follow in reverse order starting at
end point of the Track.
Points...:
View and edit all the route points in the Points Dialog.
Goto Start Location:
Position the center of the map to the start of the selected track.
If the track is the active track log, it will be shown on the map as
well.
Activate Log:
Sets the selected track as the active track log. The track is
Displayed on the current navigation screen. All subsequent position
recording added to this track. If checked, it indicates that the
selected track is the active log and GPS data will be added to it.
Press this option to deactivate the logging to the selected track.
Export…
Exports the selected file to PathAway comma delimited format, GPX,
KML or KMZ. For tracks the default extension is .pwtrk.
Delete…
Deletes the selected track database(s).
Recalc Data
Analyzes and repairs the summary statistics for the route.
Data->Tracks->Edit Track Details
For editing the details of the track log, such as name, activity, description.
Activity:
The activity the track was used for. I.e. walking, biking cycling.
Name:
Name of Track. Edit to change the name of the track log.
Description:
Description of the track.
Data->Point Databases
Lists of your points databases, Choose a point database to make the active database for which new points will be added to.
Point Database - Tools and Main Menu
Select
Perform commands on multiple Point Databases. Active the "Select"
mode, the checkmarks will appear to the right of the Point Database
name. Check all the desired databases, then choose the command to
execute.
- Delete: Delete all Checked Point Databases.
- Export: Export all Checked Point Databases.
New Database
Creates a new Point Database. Will launch the Edit Details Dialog.
Import...
Import GPS/LOC or PathAway pw* files into PathAway databases.
Data->Point Databases->Selected Points Database - Context Menu
Show Details
Displays details of the Point Database, such as name, activity, number
of points, length.
Edit Details
For modifying the details of the Point Database, such as name,
activity, and individual points. Launches the Points Database Details
Dialog.
View Points...
View Points of the selected database in the Points Dialog.
Export
Exports the selected file to PathAway comma delimited format, GPX,
KML or KMZ. For Point Databases the default extension is .pwpts.
Delete
Deletes the selected Points Database.
Data->Point Database->Edit Details
For editing the details of the Point Database, such as name, activity, description.
Activity: The activity the points in the track are used for. I.e. walking, biking cycling.
Name: Name of Point Database.
Description: Description of the Point Database
Store New Points Here: When this option is turned on for this database, then all new points will automatically be added to this database.
Data->Import
The Data Import command brings external data such as tracks, routes, and points into the app. Import local files that have been copied to the current device. Select the files from the file selector. Once the data files are imported they are organized by their type. Ie. Routes are stored in the Routes list, tracks in the Tracks list, points (waypoints) in the Point Databases list.
Supported Data: Track logs, points, routes in GPX, KML, KMZ, and PathAway delimited format.
Maps->WebMaps
WebMaps is a feature which allows you to download maps on-the-fly while navigating via GPS. WebMaps accesses various Web Map Servers to extract portions of the map to fill the screen. With WebMaps, you will always have the screen filled with a map, since new map sections are downloaded and displayed as you move.
Note, the maps are extracted from third-party services, so their availability is not guaranteed.
Download Maps from Internet:
When tuned ON, PathAway will automatically connect to the internet and
download map sections from the Source Map server.
Show Cached Maps when offline:
When Download Maps is OFF, and Show Cached is ON, then
PathAway will display the any map sections stored in the cache. You
should clear the Cache on a regular basis to prevent the device from
running out of memory.
Memory Cache Size:
Specify the amount of memory to use to cache the maps in memory. The
higher the size, the better performance. However, setting this amount
too high could cause the program to run out of memory.
Note, there is no limit set to the size of the Map Cache folder, so it should be cleared from time to time.
Maps->Offline WebMaps
This feature allows you to download and cache offline(on the device) large map sections and multiple resolutions at once rather that zoom and scroll to download them. Before selecting this option, position the map view to the area you would like to "offline". The select this option and follow the steps in the "Offline Webmaps" dialog.
Please note that downloading webmaps for offline use requires a significant amount of storage space, and could take a long time to download. Please only download the map sections you require, as the service provider may block you if you download too much data at once.
Also ensure you are connected via WIFI or tethered internet connection, to ensure you're not charged for a large amount of data downloading from your cellular service provider.
Max Zoom: Specify the zoom range to download. This option will start at the current zoom to the maximum zoom available for the map service. The Estimated size and time options will update as you change the number of zoom levels to download.
Once you press the Ok button to start the download, the program will return to the map screen. The toolbar at the bottom will change to a progress indicator showing the tiles downloaded. This process can be cancelled at any time.
Maps->Calibrate Map
Once maps have been transferred to the device, you can fine-tune the
map coordinates by matching the positions of known points on the maps,
with the actual position displayed by the map. Resolution, and offset
of the map is adjusted.
First you should select and "Show" the map you are going to calibrate
onto the map screen. If the map to calibrate is not visible, go to the
Options-Maps dialog, and choose the map by it's name, and tap the Show
button.
To calibrate the map, select the Maps-Calibrate Map
menu options. You will be shown a dialog with calibration options.
Calibrate THREE or more known points on the map: This
method allow you to select up to 9 known points to be used for
calibration. This method is useful if your map does not have horizontal
and vertical latitude and longitude lines respectively. Use this method
for the highest map accuracy. Selecting this method will bring up a
panel below the map. Options in this panel allow you to select points
on the map for use in calibration, select captured points for use, or
enter the coordinates manually.
Calibrate using Nudge Controls: Nudge Map Calibration
controls are for making small adjustments to the maps. They work best
when you have a map and have recorded tracks with the GPS and or have
marked a few points. If the track doesn't exactly line up with a road,
or points are not right on the place they should be, you can use the
nudge controls to "Line up" the maps with the known points.
Calibrate by THREE or more known points
The Known Points Calibration method brings up an interactive screen
that allows you to select the known points on the map, and then specify
their geographic coordinates. If you have saved points already, you can
select these points to be used in the calibration. Commands are as
follows:
Show: Highlight this button to automatically move the
map into view of the calibration point.
Mark: Highlight this button to mark the point on the
map as it’s pixel coordinate. To mark the point, tap and hold
on the location on the map where this point resides.
Point…: Select an existing point from the Points
Database to use as the geographic coordinates for the calibration point.
Delete/Trash: Remove the calibration point.
Edit..: Modify the calibration geographic points
manually
< # >: Traverse through the calibration points.
X: Exit Calibration mode. You will be prompted to Save
or Cancel your changes.
Calibrate using Nudge Controls
When the option for calibrating using Nudge controls is selected,
the nudge control screen is shown.
Nudge moves adjusting the calibration of the map by geographical
coordinates. This amount of adjustment is set by the nudge factor. The
nudge factor is set in decimal degrees.
This screen contains a number of buttons for adjusting the coordinates
of the map. As well, a nudge factor can be set for adjusting the
precision to which to move the map.
![]() Adjusts the map towards the corresponding direction by the
given factor (nudge).
Adjusts the map towards the corresponding direction by the
given factor (nudge).
![]() Adjusts the map in both directions horizontally
or vertically by the given factor.
Adjusts the map in both directions horizontally
or vertically by the given factor.
![]() Adjusts the map in both directions equally horizontally and
vertically by the given factor. Effect is to make the map appear to
cover a larger or smaller geographical space.
Adjusts the map in both directions equally horizontally and
vertically by the given factor. Effect is to make the map appear to
cover a larger or smaller geographical space.
Note if the geographical width is not exactly the same as the height,
then the map sizing movement will appear to be of different values
horizontally and vertically, since the pixel coverage of a nautical
mile (degree lat or lon) is different between width and height.
Map->Import
The Map Import command brings external custom maps into the app. Map Files can be imported directly or from an online service.
Local File: Import local files that have been copied to the current device. Select the files from the file selector.
Supported Maps: PathAway .prc, unprotected BSB/KAP.
Terminology
Dashboard
Customizable Border around navigation map screens. It contains useful travel statistics and information. Dashboard items can be modified via selecting a particular item and bringing up it’s context menu. See Dashboard-Context Menu in the Reference manual.
GPS
Global Positioning System uses a series of satellites to transmit data to receivers enabling them to accurately pinpoint their location and elevation on earth. Originally developed by the U.S. Department of Defense as a military system, GPS has become a global utility. It benefits users around the world in many different applications, including air, road, marine, and rail navigation, telecommunications, emergency response, oil exploration, mining, and many more. Your device includes an Embedded GPS which PathAway utilizes to obtain positional information.
Icons
Icons in PathAway are small images used in PathAway to mark the location of Points on a map.
Points
Points are locations marked by the user. Each point can be identified by a name, icon, and description. The icon you choose for your point, will be displayed on the map. In PathAway, points are stored in the Points database. You create multiple points databases to store points. The Points databases can be viewed in the Data->Point Databases Dialog. Often Points are also referred to as waypoints.
Proximity
While traveling, PathAway will display the points on the map that are in close proximity. If following a track, the distance to the closest point on the track, and the distance to the end of the track are displayed.
Simulate
Simulates a route by moving the map to points along the route in sequence until the end of the route. Use the simulate to verify routes you’ve created, or to review tracks after they’ve been recorded.
Routes
Routes can be created by linking points together in a sequence. When following a route, the distance to next point, and time and distance to destination are displayed. Also, the distance and direction off of the route is shown.
Activity
Define your mode of transportation or activity, for easy searching for routes and tracks. Time Estimates can be made by the default vehicle speed or a custom speed you choose
Tracks
Tracks can be created by recording GPS movement. These tracks can then be “Followed” to perform as an accurate guide for the travel.
WebMaps
WebMaps is a feature which allows you to download maps on-the-fly while navigating via GPS. WebMaps accesses various Web Map Servers to extract portions of the map to fill the screen.
Further Information and Instructions
For further information and instructions on using PathAway refer to the following:
PathAway Web Site - Visit http://PathAway.com Support and section for further information. The PathAway Forum is also available on the web site to help you connect with others using the program.